
My printer shows as connected in the iDrive TMS but labels are not printing
If your printer appears connected but labels are not printing from the iDrive TMS, the issue is likely related to the printer’s connection within PrintNode. PrintNode is the integration that enables label printing from the iDrive Printer Connect module in the TMS.
Printers can be deleted from PrintNode in one of two ways:
-
Removed from the computer:
The printer has been fully removed from Windows—not just disconnected. This means the printer was deleted from the list of known devices on the computer. -
Unchecked in iDrive Printer Connect Client:
Inside the iDrive Printer Connect Client, selecting Printers will display a list of connected printers. If a printer is unchecked, it will be removed from PrintNode and will no longer be available to print from the TMS.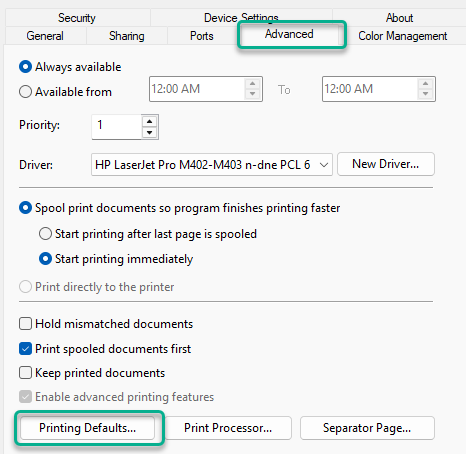
When this happens, print jobs may work intermittently—printing successfully at times and then stopping unexpectedly. This behavior is common when using network printers, as their connections to PrintNode are more likely to fail.
Best Practice:
To ensure reliable printing performance, avoid using network printers for label printing in the iDrive TMS. Instead, use a directly connected printer (via USB or local connection) whenever possible.
If the problem persists after verifying the printer is checked and connected in iDrive Printer Connect, reinstall the printer on the computer and restart the iDrive Printer Connect client before retrying the print job.
My label is printing in an odd size or rotated in an unexpected way
For Windows: If your label is printing but does not print as expected, you may need to change your Printing Defaults.
- Navigate to the 'Printers & Scanners' settings window and select the desired printer from the options listed. Note: you can find this settings screen by using the Windows search bar.
- For the selected printer, select 'Printer Properties' and then the 'Advanced' tab.
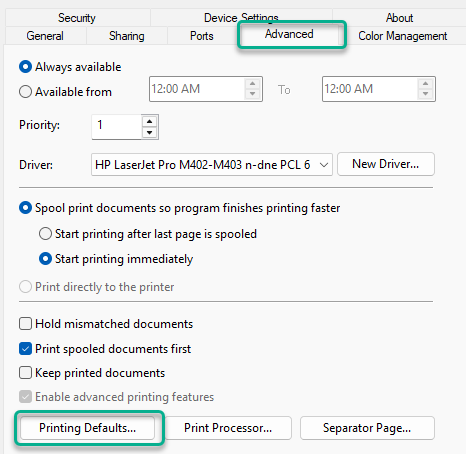
- From the ''Advanced' tab, select the 'Printing Defaults...' button and ensure your paper size is configured as '4 x 6' (or whatever dimensions best fit your desired label).
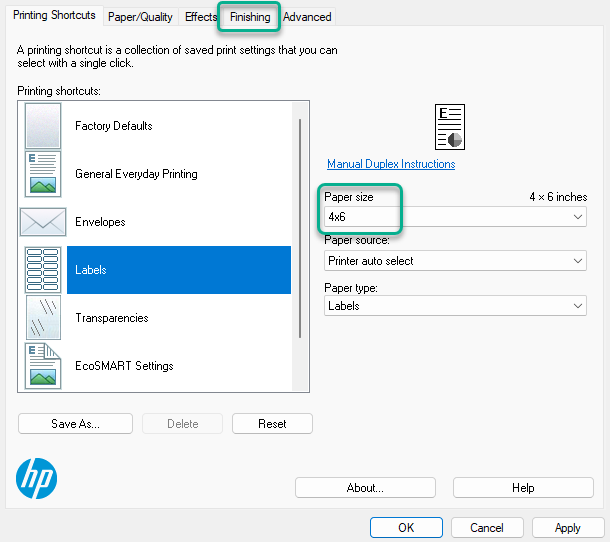
- Finally, select the 'Finishing' tab and ensure Orientation is set as 'Portrait'.
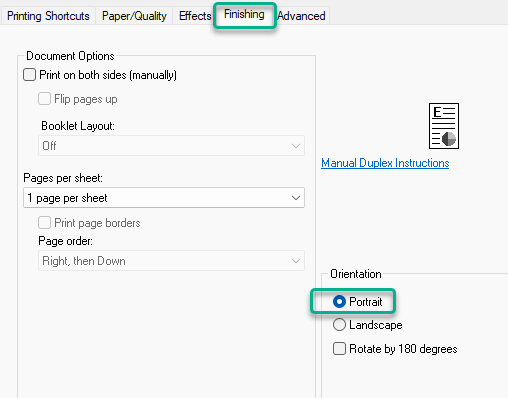
- Click 'Apply' to save Printing Defaults.